CloudNativePG
In this exercise, I wanted to learn more about running PostgreSQL in Kubernetes, for production. I decided to study and practice with CloudNativePG (CNPG), which is a Kubernetes Operator to manage PostgreSQL.
Operators are a way to extend Kubernetes capabilities to manage complex applications, like databases, by automating tasks such as deployment, scaling, and automatic failovers in case of node failure.
Why so much interest in PostgreSQL?
Started in 1986, PostgreSQL is a powerful, open-source object-relational database system, and one of the most successful and popular open-source projects ever. PostgreSQL ranked #1. in a 2023 Stack Overflow survey about the most popular technologies, in the databases category. It is known for its reliability, feature robustness, and performance, and it is widely used in production systems. I used PostgreSQL several times in the past, and I know it is a great choice.
CloudNativePG quickstart
Since I like to get the first impressions by practicing, I jumped into the CloudNativePG documentation and after reading a bit of introduction, I immediately headed to the Quickstart section, which includes instructions to try CNPG in Kind. The first impressions are great!
Level 5 Kubernetes Operator.
CloudNativePG is a Level 5 Kubernetes Operator (Auto Pilot), which means it provides full lifecycle management of the operand -in this case, PostgreSQL clusters. It automates tasks such as deployment, scaling, and automatic failovers in case of node failure.
Create a cluster with Kind, and follow the steps below to install the CloudNativePG Operator:
kind create cluster --name pg

kubectl cluster-info --context kind-pg

# install the CNPG operator
kubectl apply --server-side -f \
  https://raw.githubusercontent.com/cloudnative-pg/cloudnative-pg/release-1.26/releases/cnpg-1.26.1.yaml

# check for the status
kubectl rollout status deployment -n cnpg-system cnpg-controller-manager
The output of the final command should say: deployment "cnpg-controller-manager" successfully rolled out.
Create a CloudNativePG cluster
Now, create a PostgreSQL cluster, using the example manifest of the
documentation, like in ./examples/06-cloudnativepg/:
apiVersion: postgresql.cnpg.io/v1
kind: Cluster
metadata:
  name: cluster-example
spec:
  instances: 3

  storage:
    size: 1Gi
If you list the services with kubectl get svc, you should see three services
created:
$ kubectl get svc

NAME                 TYPE        CLUSTER-IP      EXTERNAL-IP   PORT(S)    AGE
cluster-example-r    ClusterIP   10.96.217.220   <none>        5432/TCP   6s
cluster-example-ro   ClusterIP   10.96.18.205    <none>        5432/TCP   6s
cluster-example-rw   ClusterIP   10.96.107.144   <none>        5432/TCP   6s
kubernetes           ClusterIP   10.96.0.1       <none>        443/TCP    6m56s
These services are documented in the Service Management section of the CloudNativePG documentation.
cluster-example-rwpoints to the primary instance of the cluster (read/write). This is necessary for replication.cluster-example-ropoints to the replicas, where available (read-only).cluster-example-rpoints to any PostgreSQL instance in the cluster (read).
Connect to the CloudNativePG cluster
The CloudNativePG's QuickStart here becomes dispersive, as it forgets to describe how to connect to the database, and it jumps to the subject of how to Monitor clusters with Prometheus and Grafana. For information on how to connect to the database, you need to move to another page: Connecting from an application.
By default, CloudNativePG creates a PostgreSQL user named app with limited
access (e.g., it cannot create new databases) and a single database named app.
The password for this user is stored in a Kubernetes secret named <cluster-name>-app.
To test a connection to the database server:
- use
kubectl port-forwardto forward the service port to your local machine - obtain the password for the
appuser from the Kubernetes secret - connect using
psqlor any other PostgreSQL client
kubectl port-forward svc/cluster-example-rw 5432:5432

# Get the password for the app user
PGPASSWORD=$(kubectl get secret cluster-example-app -o jsonpath="{.data.password}" | base64 -d)
Then, let's use psql to connect to the database. Here I use psql installed
in the host, like documented here:
If the connection is successful, you should see the psql prompt:
psql (17.5 (Ubuntu 17.5-1.pgdg24.04+1))
SSL connection (protocol: TLSv1.3, cipher: TLS_AES_256_GCM_SHA384, compression: off, ALPN: postgresql)
Type "help" for help.

app=>
Just to practice, let's create a table and insert some data:
CREATE TABLE cookie (
    id SERIAL PRIMARY KEY,
    text TEXT NOT NULL
);

INSERT INTO cookie (text) VALUES ('You will eat more cookies today.');

INSERT INTO cookie (text) VALUES ('Sleep more.');

SELECT * FROM cookie;
We can also verify that the user app cannot create new databases:
This should fail with the error: ERROR: permission denied to create database.
To exit psql, type \q. The port-forwarding seems to be closed when you exit
psql, so you need to run it again if you want to connect again.
Enable the super user
To enable the super user (one that we can use to connect and create new databases),
we need to add the enableSuperuserAccess: true line to the cluster manifest:
apiVersion: postgresql.cnpg.io/v1
kind: Cluster
metadata:
  name: cluster-example
spec:
  instances: 3

  enableSuperuserAccess: true  # enable super use postgres
And repeat a deployment:
If you list the secrets now, you should see a new secret named *-superuser:
$ kubectl get secret
NAME                          TYPE                       DATA   AGE
cluster-example-app           kubernetes.io/basic-auth   11     24m
cluster-example-ca            Opaque                     2      24m
cluster-example-replication   kubernetes.io/tls          2      24m
cluster-example-server        kubernetes.io/tls          2      24m
cluster-example-superuser     kubernetes.io/basic-auth   11     22s
To connect to the database using the super user;
# Get the password for the app user
PGPASSWORD=$(kubectl get secret cluster-example-superuser -o jsonpath="{.data.password}" | base64 -d)

PGPASSWORD=$PGPASSWORD psql -h localhost -p 5432 -U postgres postgres
Which should open a psql session as the super user:
psql (17.5 (Ubuntu 17.5-1.pgdg24.04+1))
SSL connection (protocol: TLSv1.3, cipher: TLS_AES_256_GCM_SHA384, compression: off, ALPN: postgresql)
Type "help" for help.

postgres=#
Try creating a new database:
Then list DBs with \l, and connect to the new database with \c testdb.
postgres=# CREATE DATABASE testdb;
CREATE DATABASE
postgres=# \l
                                                List of databases
   Name    |  Owner   | Encoding | Locale Provider | Collate | Ctype | Locale | ICU Rules |   Access privileges
-----------+----------+----------+-----------------+---------+-------+--------+-----------+-----------------------
 app       | app      | UTF8     | libc            | C       | C     |        |           |
 postgres  | postgres | UTF8     | libc            | C       | C     |        |           |
 template0 | postgres | UTF8     | libc            | C       | C     |        |           | =c/postgres          +
           |          |          |                 |         |       |        |           | postgres=CTc/postgres
 template1 | postgres | UTF8     | libc            | C       | C     |        |           | =c/postgres          +
           |          |          |                 |         |       |        |           | postgres=CTc/postgres
 testdb    | postgres | UTF8     | libc            | C       | C     |        |           |
(5 rows)

postgres=# \c testdb
SSL connection (protocol: TLSv1.3, cipher: TLS_AES_256_GCM_SHA384, compression: off, ALPN: postgresql)
You are now connected to database "testdb" as user "postgres".
testdb=#
Reading time…
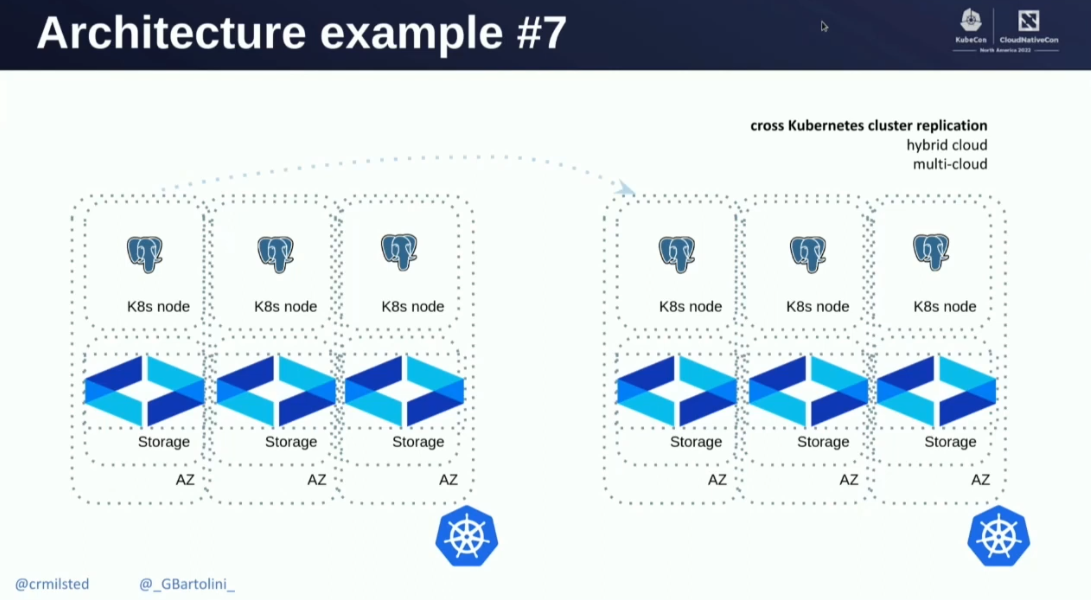
The first impressions are great! I decided to dive deeper into the documentation before continuing with practicing. I watched the recording of the talk given by Chris Milsted and Gabriele Bartolini at KubeCon NA 2022, entitled "Data On Kubernetes, Deploying And Running PostgreSQL And Patterns For Databases In a Kubernetes Cluster".
The talk covers several important topics, including architectures like the one illustrated below, which shows a cross-cluster replication setup with CloudNativePG, where the primary cluster is in one Kubernetes cluster and the replica cluster is in another Kubernetes cluster, with the replication happening over the internet.
I read the following article, which provides useful information and a great insight into running data workloads in Kubernetes:
And I learnt about the Data on Kubernetes (DoK) Community, as I wasn't aware of it. The DoK community is a group of people interested in running data workloads in Kubernetes.
Share storage for local development
For local development, I wanted to persist the storage of the
PostgreSQL cluster on the host. The diagram below illustrates the scenario I
wished to achieve, where each PostgreSQL instance in the cluster has its own
pgdata folder mounted from the host machine.
flowchart TD
    subgraph Host Machine
        direction LR
        subgraph /home/pgdata/
            A1[/instance-1/]
            A2[/instance-2/]
            A3[/instance-3/]
        end
    end

    subgraph "Kubernetes Cluster (Kind)"
        direction LR
        P1["**Pod: 1**<br/>(PostgreSQL Instance 1)"]
        P2["**Pod: 2**<br/>(PostgreSQL Instance 2)"]
        P3["**Pod: 3**<br/>(PostgreSQL Instance 3)"]
    end

    P1 ---|hostPath mount| A1
    P2 ---|hostPath mount| A2
    P3 ---|hostPath mount| A3
This would be useful for local development, as it would allow to persist
development data across cluster reconstructions.
I managed to use local folders using a custom storageClass, but it turned out
to be useless because CloudNativePG does not support this scenario. The
authors of CloudNativePG hold the opinion that, if a CNPG cluster is
deleted, then also the PostgreSQL data must be deleted. Even if data is
preserved using the option persistentVolumeReclaimPolicy: Retain
for persistent volumes, CNPG will ignore existing data anyway and create a new pgdata.
In my opinion, this is a sad design choice, as it makes it difficult to recover
from accidental deletions of the cluster, and it makes it harder to work with a
realistic development environment. The discussion about this topic can be found here:
CNPG discussion #5253. And
a workaround is proposed in the CNPG PR #8095 (development
experience would be bad).
What Kubernetes does.
Kubernetes by default deletes data when a PersistentVolume is deleted, but
you can change this behavior by setting the persistentVolumeReclaimPolicy to
Retain. This means that the data will be preserved even if the PersistentVolume
is deleted, and you can reuse it later. On the other hand, Kubernetes by
default does not delete data when using StatefulSets.
Kubernetes' documentation in this regard says:
Deleting and/or scaling a StatefulSet down will not delete the volumes associated with the StatefulSet. This is done to ensure data safety, which is generally more valuable than an automatic purge of all related StatefulSet resources.
CloudNativePG by design does not rely on StatefulSet resources, and instead
manages the underlying PVCs directly, for the reasons described at Custom Pod Controller.
In this context, it is more understandable why the authors of CNPG decided to
follow the default behavior of Persistent Volumes.
My useless example with storageClass.
For reference, below is what I tried to achieve the desired scenario,
using a custom storageClass to mount local folders from the host machine and
persistentVolumeReclaimPolicy: Retain.
This example is not recommended, as CloudNativePG won't reuse data anyway, and
it failed after a host reboot.
Create the directories on the host machine:
Prepare a Kind configuration file using the template below:
# kind config template (TODO: replace $HOME with your home directory)
kind: Cluster
apiVersion: kind.x-k8s.io/v1alpha4
nodes:
  - role: control-plane
    extraMounts:
      - hostPath: $HOME/pgdata
        containerPath: /pgdata
Replace $HOME in the template above with your home directory, manually or
using envsubst:
Prepare a manifest like below:
apiVersion: storage.k8s.io/v1
kind: StorageClass
metadata:
  name: cnpg-hostpath
provisioner: kubernetes.io/no-provisioner
volumeBindingMode: WaitForFirstConsumer
---
apiVersion: v1
kind: PersistentVolume
metadata:
  name: cnpg-hostpath-pv-1
spec:
  capacity:
    storage: 1Gi
  accessModes:
    - ReadWriteOnce
  persistentVolumeReclaimPolicy: Retain
  storageClassName: cnpg-hostpath
  hostPath:
    path: /pgdata/instance-1
---
apiVersion: v1
kind: PersistentVolume
metadata:
  name: cnpg-hostpath-pv-2
spec:
  capacity:
    storage: 1Gi
  accessModes:
    - ReadWriteOnce
  persistentVolumeReclaimPolicy: Retain
  storageClassName: cnpg-hostpath
  hostPath:
    path: /pgdata/instance-2
---
apiVersion: v1
kind: PersistentVolume
metadata:
  name: cnpg-hostpath-pv-3
spec:
  capacity:
    storage: 1Gi
  accessModes:
    - ReadWriteOnce
  persistentVolumeReclaimPolicy: Retain
  storageClassName: cnpg-hostpath
  hostPath:
    path: /pgdata/instance-3
---
apiVersion: postgresql.cnpg.io/v1
kind: Cluster
metadata:
  name: cluster-example
spec:
  instances: 3
  enableSuperuserAccess: true
  storage:
    size: 1Gi
    storageClass: cnpg-hostpath
Follow the instructions described in this page to create a Kind cluster and
apply the manifest. The PostgreSQL instances will write data in the
~/pgdata/instance-{1,2,3}, but if you recreate the cluster in the same way,
CNPG will not reuse the data anyway, unless you fight with its design choice.
# ./examples/06-cloudnativepg/useless/
envsubst < kind-template.yaml > kind.yaml

kind create cluster --config kind.yaml --name pg

kubectl cluster-info --context kind-pg

# Install the CloudNativePG operator, like earlier
kubectl apply --server-side -f \
  https://raw.githubusercontent.com/cloudnative-pg/cloudnative-pg/release-1.26/releases/cnpg-1.26.1.yaml

kubectl rollout status deployment -n cnpg-system cnpg-controller-manager

kubectl apply -f cluster-example.yaml

# watch the status of the deployment
watch kubectl get pods
Include a Load Balancer
To include a Load Balancer, do like documented at Service Management > Adding Your Own Services to include a LoadBalancer. Beware that:
- With
kind, you need to run thecloud-provider-kindtool as described previously, and keep it running. - CloudNativePG requires to not modify the default services it creates. The documentation says: you cannot use any of the default reserved service names that follow the convention <CLUSTER_NAME>-<SERVICE_NAME>.
An example is provided at ./examples/06-cloudnativepg/cluster-example-03.yaml:
# …existing code…
apiVersion: postgresql.cnpg.io/v1
kind: Cluster
metadata:
  name: cluster-example
spec:
  instances: 3
  enableSuperuserAccess: true
  storage:
    size: 1Gi
    storageClass: cnpg-hostpath
  managed:
    services:
      additional:
        - selectorType: rw
          serviceTemplate:
            metadata:
              name: "mydb-lb"
            spec:
              type: LoadBalancer
Run cloud-provider-kind in a different terminal.terminal:
Apply changes:
# ./examples/06-cloudnativepg/
kubectl apply -f cluster-example-03.yaml

# watch the status of the deployment
watch kubectl get pods
After a few seconds, you should see three pods running, like:
NAME                READY   STATUS    RESTARTS   AGE
cluster-example-1   1/1     Running   0          103s
cluster-example-2   1/1     Running   0          83s
cluster-example-3   1/1     Running   0          64s
List services to see the new Load Balancer service created:
Connect to the database using psql using the Load Balancer IP address:
# Get the Load Balancer IP address
LB_IP=$(kubectl get svc/mydb-lb -o=jsonpath='{.status.loadBalancer.ingress[0].ip}')
PGPASSWORD=$(kubectl get secret cluster-example-superuser -o jsonpath="{.data.password}" | base64 -d)

PGPASSWORD=$PGPASSWORD psql -h $LB_IP -p 5432 -U postgres postgres
The connection should be successful, and you should see the psql prompt.
Full recipe.
This is a full recipe, when starting from scratch:
# ./examples/06-cloudnativepg/
kind create cluster --config kind.yaml --name pg

kubectl cluster-info --context kind-pg

# Install the CloudNativePG operator, like earlier
kubectl apply --server-side -f \
  https://raw.githubusercontent.com/cloudnative-pg/cloudnative-pg/release-1.26/releases/cnpg-1.26.1.yaml

kubectl rollout status deployment -n cnpg-system cnpg-controller-manager

kubectl apply -f cluster-example-03.yaml

# watch the status of the deployment
watch kubectl get pods
Test automatic failover
To test the automatic failover performed by CloudNativePG, we can delete the
primary pod and see if a new primary is elected automatically.
To see which pod is the primary, detect the one with label cnpg.io/instanceRole=primary:
In my case, the first pod is the primary:
NAME                READY   STATUS    RESTARTS   AGE   LABELS
cluster-example-1   1/1     Running   0          18m   cnpg.io/cluster=cluster-example,cnpg.io/instanceName=cluster-example-1,cnpg.io/instanceRole=primary,cnpg.io/podRole=instance,role=primary
cluster-example-2   1/1     Running   0          18m   cnpg.io/cluster=cluster-example,cnpg.io/instanceName=cluster-example-2,cnpg.io/instanceRole=replica,cnpg.io/podRole=instance,role=replica
cluster-example-3   1/1     Running   0          17m   cnpg.io/cluster=cluster-example,cnpg.io/instanceName=cluster-example-3,cnpg.io/instanceRole=replica,cnpg.io/podRole=instance,role=replica
You can also get the primary pod and replicas by label:
kubectl get pod -l cnpg.io/cluster=cluster-example,cnpg.io/instanceRole=primary

kubectl get pod -l cnpg.io/cluster=cluster-example,cnpg.io/instanceRole=replica
To test automatic failover, delete the primary pod:
# delete the primary pod by label:
kubectl delete pod -l cnpg.io/cluster=cluster-example,cnpg.io/instanceRole=primary
Hurray!  A new primary was elected instantly, and a new secondary
pod was created to replace the deleted primary pod. You can verify this by
listing the pods again:
A new primary was elected instantly, and a new secondary
pod was created to replace the deleted primary pod. You can verify this by
listing the pods again:
$ kubectl delete pod -l cnpg.io/cluster=cluster-example,cnpg.io/instanceRole=primary
pod "cluster-example-1" deleted

$ kubectl get pods --show-labels
NAME                READY   STATUS    RESTARTS   AGE   LABELS
cluster-example-1   1/1     Running   0          12s   cnpg.io/cluster=cluster-example,cnpg.io/instanceName=cluster-example-1,cnpg.io/instanceRole=replica,cnpg.io/podRole=instance,role=replica
cluster-example-2   1/1     Running   0          19m   cnpg.io/cluster=cluster-example,cnpg.io/instanceName=cluster-example-2,cnpg.io/instanceRole=primary,cnpg.io/podRole=instance,role=primary
cluster-example-3   1/1     Running   0          19m   cnpg.io/cluster=cluster-example,cnpg.io/instanceName=cluster-example-3,cnpg.io/instanceRole=replica,cnpg.io/podRole=instance,role=replica
Wonderful!
Summary
In this exercise, I learned how to create a PostgreSQL cluster using
CloudNativePG, a Kubernetes Operator for managing
PostgreSQL clusters in Kubernetes. I practiced creating a cluster, connecting
to it using psql, and enabling the super user. I also learned how to share
storage for local development using Kind, and how to include a Load Balancer
to connect to the database from outside the cluster. Finally, I tested the
automatic failover feature by deleting the primary pod and verifying that a new
primary was elected automatically.
Next steps
In my next steps, I plan to:
- Try Zalando's PostgreSQL Operator.
- Start practicing with Kubeadm, to create a real cluster.
Last modified on: 2025-08-09 12:46:00